
CrashPlan Server Backup protects your organization's critical server data by continuously backing up your files to the CrashPlan environment. This guide walks you through the essential steps to deploy the CrashPlan Server Agent (called as CrashPlan Backup for Servers), activate the Server, configure the assets, and verify that your data is protected.
Prerequisites
Before deploying CrashPlan for Server Backup, ensure you have:
A Server for Backup with supported OS version
Purchase a CrashPlan Backup for Servers subscription
Administrator access to the CrashPlan portal
Whitelist CrashPlan Software and config files. For information on this, refer to Security Software Whitelisting and Exclusions.
STEP 1: Accessing the CrashPlan Console for the first time
After CrashPlan completes the tenant setup, you will receive a welcome email with instructions to begin the onboarding process.
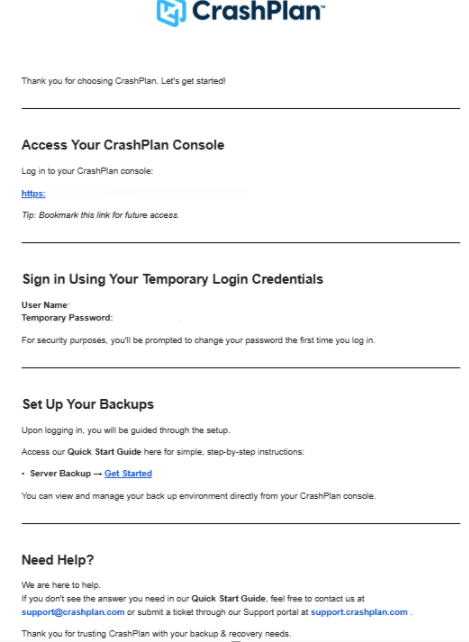
Open the welcome email and click the dedicated CrashPlan console URL.
Sign in using the temporary credentials provided in the email.
Complete the initial setup by configuring your backup policies.
If you already have a CrashPlan tenant setup, you can use the existing CrashPlan console with the login credentials.
STEP 2: Registering the CrashPlan Backup for Servers
To add a new server to CrashPlan, you must first generate an activation token. This token is used during the installation of the CrashPlan Backup for Servers to securely register the server with your CrashPlan environment.
In the CrashPlan portal, navigate to Server Backup → Manage All Assets section, click Add Server(s). The Manage Server Activation Token dialog box appears.
If no activation token exists, the Manage Server Activation Token dialog displays the message: "There is no token generated. Do you want to generate a new token now?"
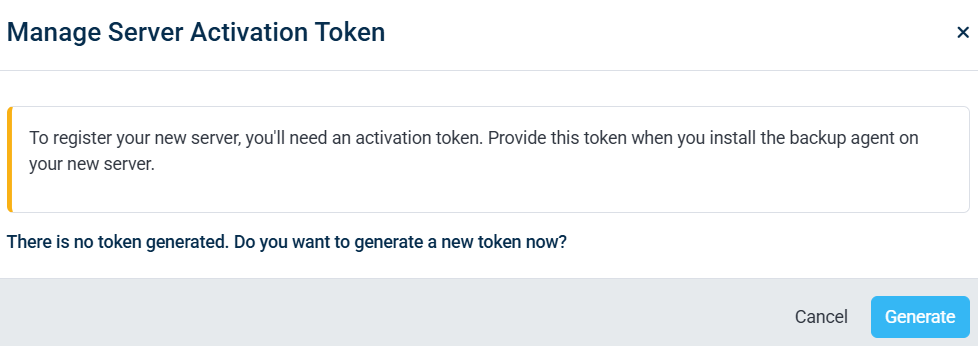
Click Generate.
CrashPlan generates a new activation token that you can use during the server backup agent installation.
Copy the activation token and provide it when prompted during the installation of the CrashPlan Backup for Servers on the server you wish to backup.
The token remains valid until its expiration period and can be viewed, copied, extended, or revoked from the Manage Server Activation Token dialog. For more information, see Managing Tokens.
After the backup agent is installed using the activation token, the CrashPlan Backup for Servers is securely registered with CrashPlan and appears in the Manage All Assets page, where you can assign policies and monitor backup status.
STEP 3: Downloading the Server Agent
After generating the activation token, follow the steps below to download and install the CrashPlan Backup for Server Agent. In the CrashPlan portal, navigate to the User Profile → Download Agent.

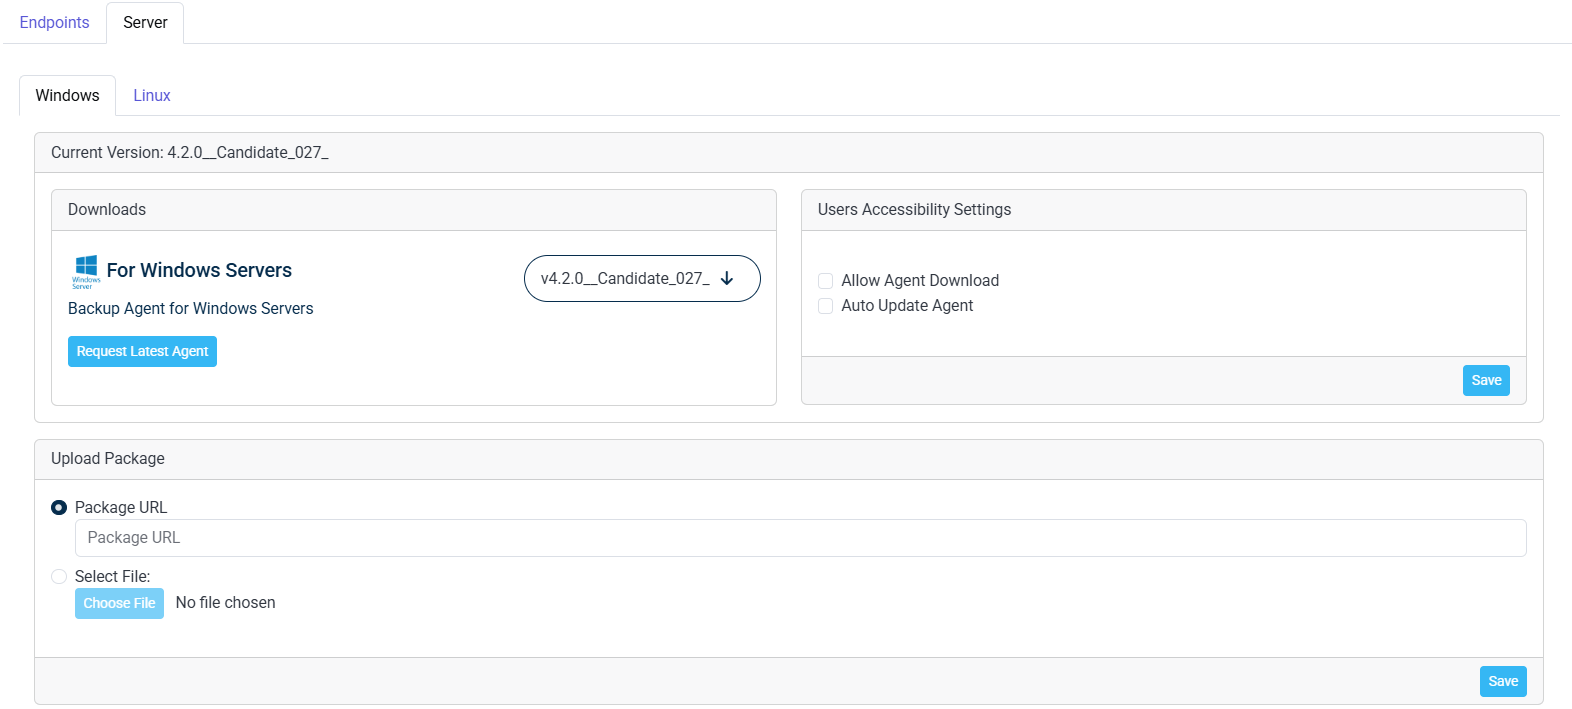
On the Settings page for Server, select Windows tab.
In the Windows tab, locate the Downloads section and click Request Latest Agent to download the latest version of the agent (In case of no agent is available or you need the latest agent, click Request Latest Agent button).
Once the agent is available for download, Click the Download icon next to the displayed agent version.
STEP 4: Installing the CrashPlan Backup for Servers
Once the download is complete, locate the downloaded installer (.exe file). Install the downloaded file on the required server.
The Current Version is displayed at the top of the page which indicates the agent version currently available for download.
Double-click the installer file to start the installation. Follow the installation wizards, accepting the License Agreement, and completing the CrashPlan Backup for Servers configuration setup process.
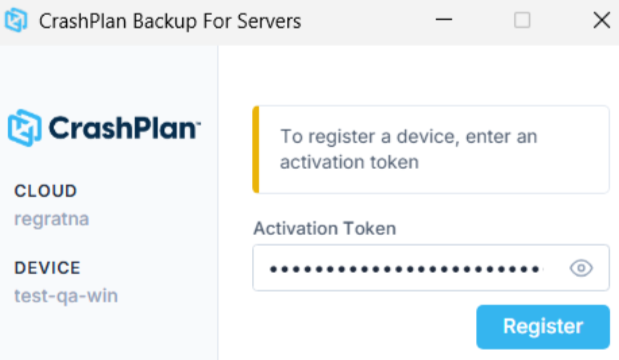
Wait a few minutes for the Activation Token screen to appear.
Enter the generated Activation Token received in the email or copied from the portal to complete the agent configuration and registration process.
Do not close the installer or restart the server unless prompted by the installation workflow.
Click Register. After your system is registered, assign a policy from the CrashPlan Platform, and the backup will start according to the schedule. CrashPlan Backup for Servers is installed on your server.
If the backup needs to be suspended temporarily for any server, select the No Backup policy against that server name and click Apply to confirm the policy change.
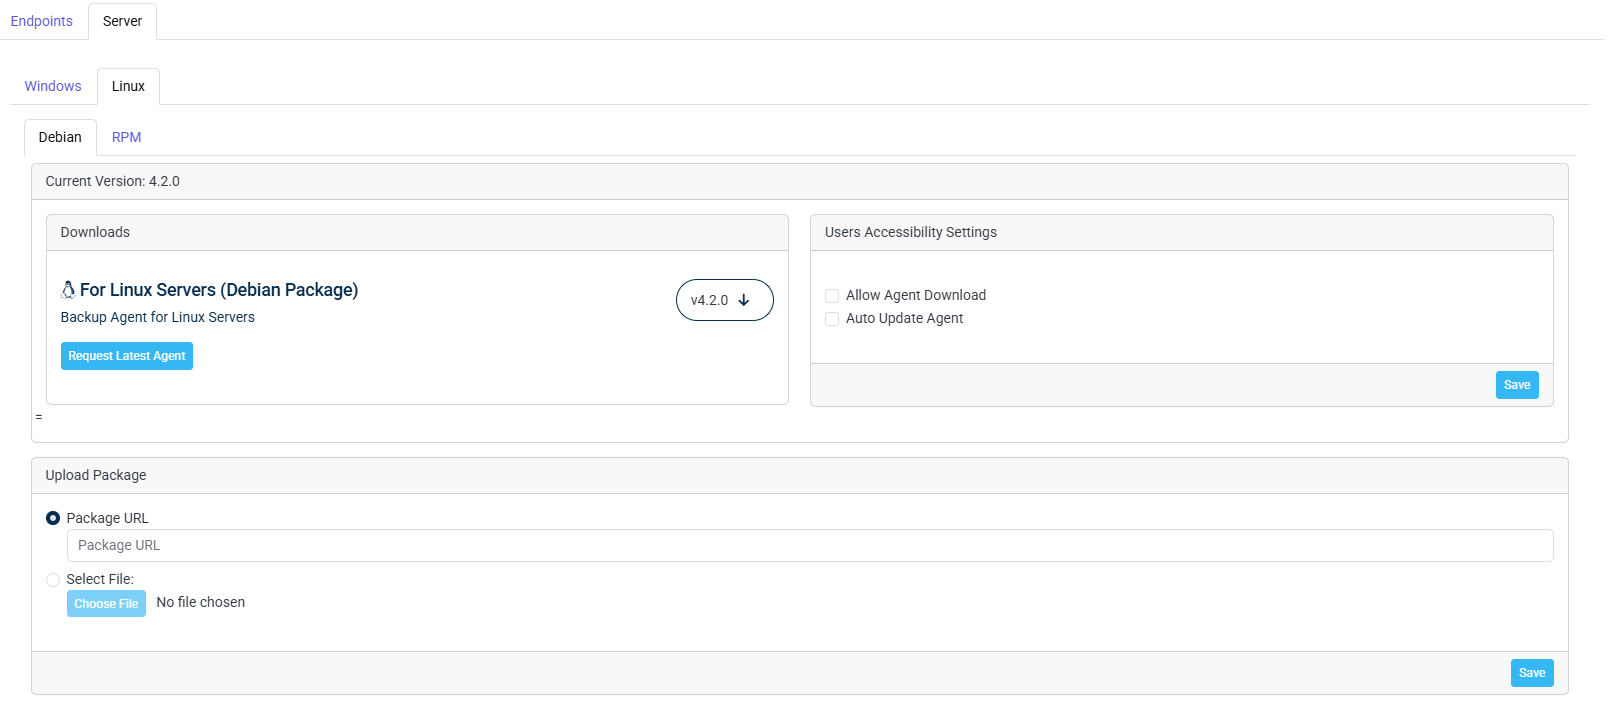
On the Settings page for Server, select Linux tab.
Select the package type that matches your Linux distribution:
Debian — for Debian-based Linux systems.
RPM — for RPM-based Linux systems.
Click Request Latest Agent. For more information, see Requesting the Latest Linux Server Agent.
In the Downloads section, locate the appropriate Linux Server Agent.
Click the Download icon next to the displayed agent version.
The Current Version is displayed at the top of the page which indicates the agent version currently available for download.
STEP 4: Installing the CrashPlan Backup for Servers
Once the download is complete, locate the downloaded installer (.exe file).
Double-click the installer file to start the installation. Follow the installation wizards, accepting the License Agreement, and completing the CrashPlan Backup for Servers configuration setup process.
Wait a few minutes for the Activation Token screen to appear.
Enter the generated Activation Token received in the email to complete the agent configuration and registration process.
Do not close the installer or restart the server unless prompted by the installation workflow.
Click Register. After your system is registered, assign a policy from the CrashPlan Platform, and the backup will start according to the schedule. CrashPlan Backup for Servers is installed on your server.
If the backup needs to be suspended temporarily for any server, select the No Backup policy against that server name and click Apply to confirm the policy change.
Requesting the Latest Linux Server Agent
If you need to obtain the latest available agent version:
On the Linux tab, click Request Latest Agent.
Review the Current Version and Latest Version displayed in the Agent Request dialog.
Click OK to submit the request or click Cancel to close the dialog.
For Silent Installation and Registration of Linux Server, see CRASHPLAN BACKUP FOR LINUX SERVERS - INSTALLATION GUIDE.
When the current version appears as NA, click Request Latest Agent to check for the latest available agent.
If the Current Version and Latest Version are the same, no newer agent version is currently available.
Silent Installation Process
In CrashPlan portal navigate to Settings → Backup Agent Package Management in the portal.
Select the Server tab and choose the required operating system, for example, Windows, Linux.
Under the Downloads section, click Request Latest Agent.
Once the request is submitted, it may take some time for the agent package to be generated.
After the package is generated, the Download option will become available. Download the Server Backup Agent package.
Once the installer is downloaded, we can install the agent silently using the command-line parameters.
During the installation, we need to pass the deployment/registration token. This token is used to register the server with the appropriate CrashPlan environment.
Sample Silent Installation Command
For Windows, the silent installation command will look like this:
For example:
Here:
Windows_4.1.0_CrashPlan_Backup_For_Servers.exe– The downloaded Server Backup Agent installer./S– Installs the agent in silent mode, without requiring manual interaction.-t "token"– Passes the deployment/registration token during installation so the agent can register with the CrashPlan environment.
Refer to the Mass deployment flow:
Request Latest Agent → Wait for Package Generation → Download Agent → Run Silent Installation Command → Pass the Deployment Token → Agent Registers the Server
This approach can also be used for mass deployment, where the deployment token can be used to register multiple servers, based on the deployment requirements.
STEP 5: Verifying the Server Status
Verify that the registered server is visible and active in the CrashPlan console by following the steps below:
Navigate to CrashPlan Platform -> Manage All Assets.
Locate the Server you added.
Verify that the Status of the Server is Active.
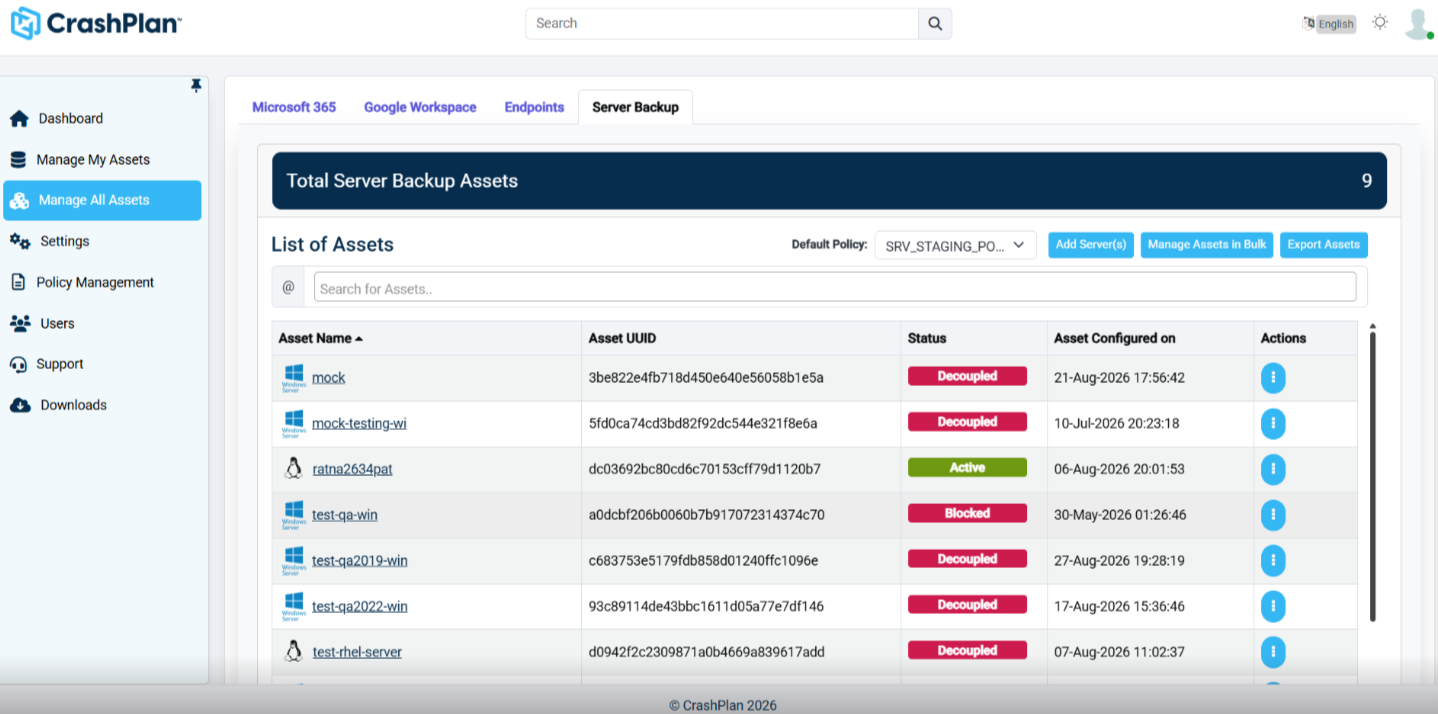
The Server "Active" status verifies that the CrashPlan for Servers is successfully registered to the CrashPlan Console.
STEP 6: Confirming the Backup Policies
Once the server is active, CrashPlan start protecting the server based on the assigned backup policy.
Go to the CrashPlan Dashboard.
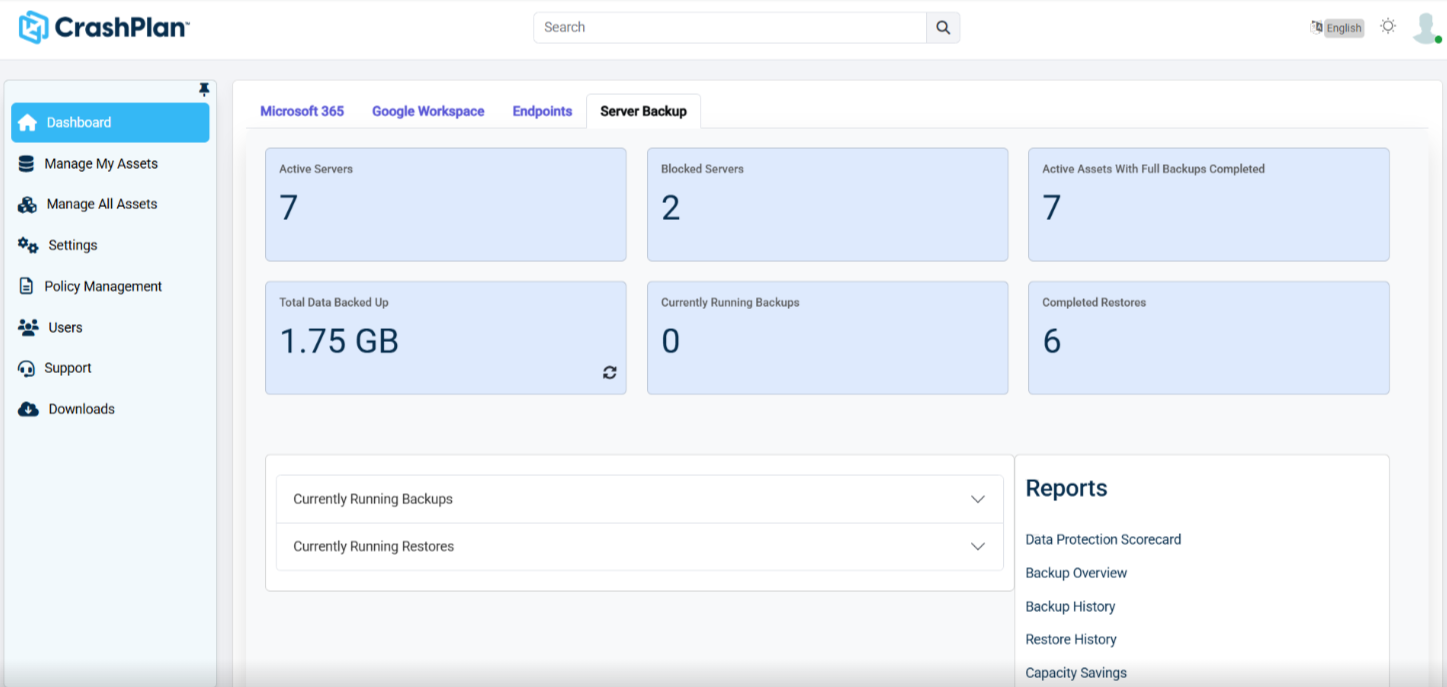
Review backup job status.
Confirm that backup jobs are running successfully.
Use the available reporting sections to monitor activity and progress.
Data Protection Scorecard
Backup Overview
Backup History
Restore History
Next steps
Once your assets are configured, your backups will begin automatically.
ADMINISTRATOR GUIDE - Learn more about the product and deep dive into available features.
Contact our technical support team - If you have questions or run into issues.