
The Manage All Assets screen allows administrators to view, configure, monitor, and manage all endpoint backup assets in the CrashPlan platform.
To access the Manage All Assets screen:
Log in to the CrashPlan Administration Portal.
From the left navigation pane, click Manage All Assets.
The List of Assets screen appears, displaying all configured endpoint backup assets.
Managing the Endpoints
To modify or update endpoints configuration details, follow the below steps:
Click the three-dot menu beside the asset.
Select Manage Asset.
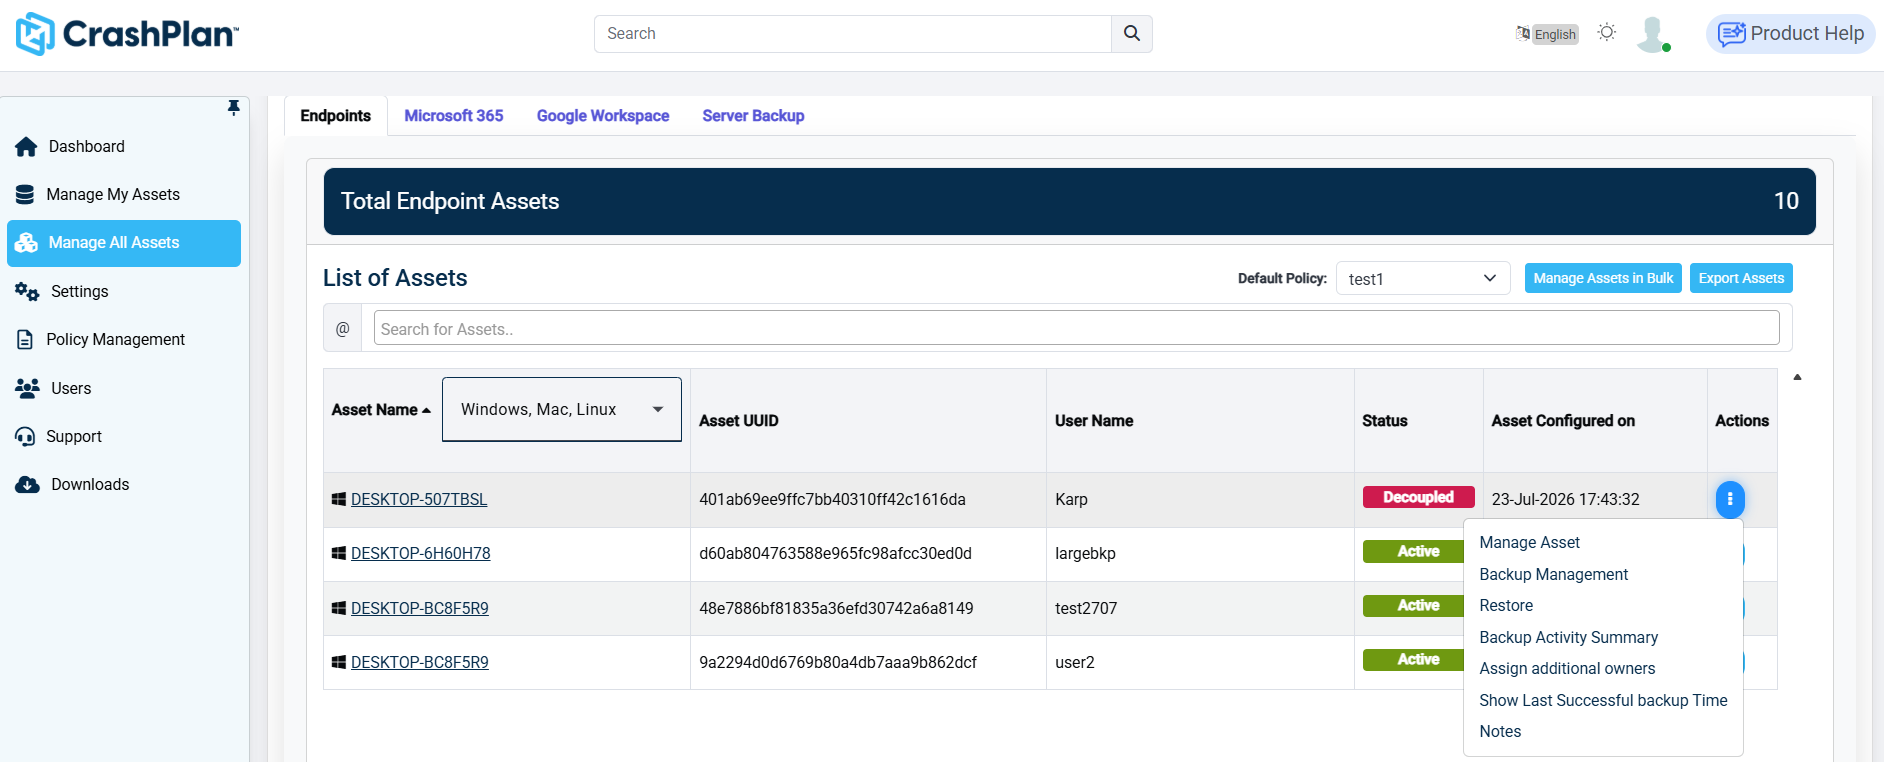
Update the required asset settings.
Click Save to apply the changes.
Backup Management
Used to configure or manage backup settings and schedules for the selected asset.
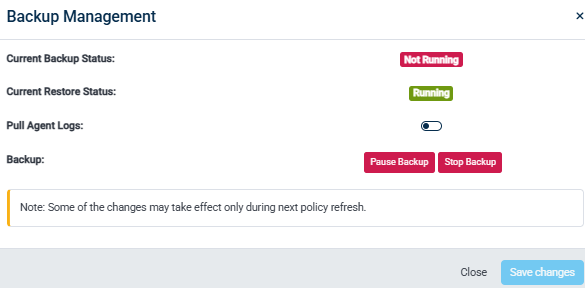
Navigate to the endpoint asset for which you want to manage backup operations.
Open the Backup Management dialog.
Review the current status:
Current Backup Status – Displays the current state of the backup operation (for example, Running, Paused, or Not Running).
Current Restore Status – Displays the current state of any restore operation.
(Optional) Enable Pull Agent Logs to collect the latest agent logs from the endpoint for troubleshooting.
Use one of the following backup actions as required:
Pause Backup – Temporarily pauses the current backup operation. Backups can be resumed later.
Stop Backup – Stops the current backup operation. Any subsequent backup starts according to the configured backup schedule or policy.
Click Save changes to apply your changes.
Click Close to exit the dialog without saving.
Backup Management Options
Option | Description |
|---|---|
Current Backup Status | Displays the current backup state of the endpoint. |
Current Restore Status | Displays the current restore state of the endpoint. |
Pull Agent Logs | Retrieves the latest endpoint agent logs for diagnostic and troubleshooting purposes. |
Pause Backup | Temporarily suspends the ongoing backup operation. |
Stop Backup | Stops the current backup operation. |
Save changes | Applies the selected changes. |
Close | Closes the dialog without applying changes. |
Some changes may not take effect immediately and are applied during the next policy refresh cycle.
Restore
Used to recover backed-up data from the selected server asset.
Open the asset action menu.
Select Restore.
Browse and select the required backup data.
Choose the restore destination.
Start the restore operation.
On macOS, when backups of the Movies, Music, and Pictures folders are restored to a different location, the restored item count may differ from the original. This occurs because macOS may include hidden system files in the backup that are not visible in the restored location.
Backup Activity Summary
Displays backup activity and operational history for the selected asset.
Open the asset action menu.
Select Backup Activity Summary.
Review backup job history, status, and operational details.
Each backup job displays the following information:
Column | Description |
|---|---|
Start Time | Date and time when the backup job started. |
End Time | Date and time when the backup job completed. |
Attempted | Total number of files or items processed during the backup. |
Total Items | Total number of items included in the backup operation. |
Success | Number and percentage of items successfully backed up. |
Failed | Number of items that failed to back up. |
Comments | Displays the overall status or result of the backup operation, such as Successfully Completed, No backup window occurred, or Backup successfully completed. No files found. |
Detailed Analysis | Click Show Details to view additional information about the selected backup job, including processed items and any backup errors. |
Viewing Backup Details
Locate the required backup job.
Click Show Details in the Detailed Analysis column.
Review the detailed backup information to identify successful operations, skipped items, or backup failures.
A backup job may complete successfully even if no files were available for backup. If the Failed column displays a value greater than 0, use Show Details to investigate the affected items and determine the cause of the failures.
Show Last Successful Backup Time
Displays the timestamp of the most recent successful backup operation.
Open the asset action menu.
Select Show Last Successful Backup Time.
Review the displayed backup completion time.
Assign additional owners
The Assign additional owners dialog allows administrators to assign one or more additional users to manage a selected endpoint asset. Additional owners can perform supported management actions on the assigned asset without changing the primary asset ownership.
Navigate to the endpoint asset that you want to assign additional owners to.
Open the Assign additional owners dialog.
Verify the Asset Name displayed at the top of the dialog.
In the Assign Asset to field, click Select Users.
Search for and select one or more users to assign as additional owners.
Click Save changes to apply the assignment.
Click Cancel to close the dialog without saving.
Field | Description |
|---|---|
Asset Name | Displays the name of the selected endpoint asset. |
Assign Asset to | Allows you to search for and select one or more users to assign as additional owners of the asset. |
Save changes | Saves the selected user assignments. |
Cancel | Closes the dialog without saving any changes. |
Assigning additional owners grants the selected user's permission to manage the asset. The primary asset ownership remains unchanged.
Notes
Allows administrators to add or manage notes related to the selected asset.
Open the asset action menu.
Select Notes.
Enter or update the required notes.
Save the notes.