
To access your individual assets, click on the Manage My Assets in the left navigation pane of the CrashPlan Platform.
The Manage My Assets page allows users to view and manage the backup status of Endpoint assets assigned to them. It provides visibility into asset configuration, backup status, and recovery options.
To Manage My Assets for Endpoint Backup:
Log in to the CrashPlan Portal using your administrator credentials.
From the left navigation pane, click Manage My Assets to access the list of assets assigned to your account.
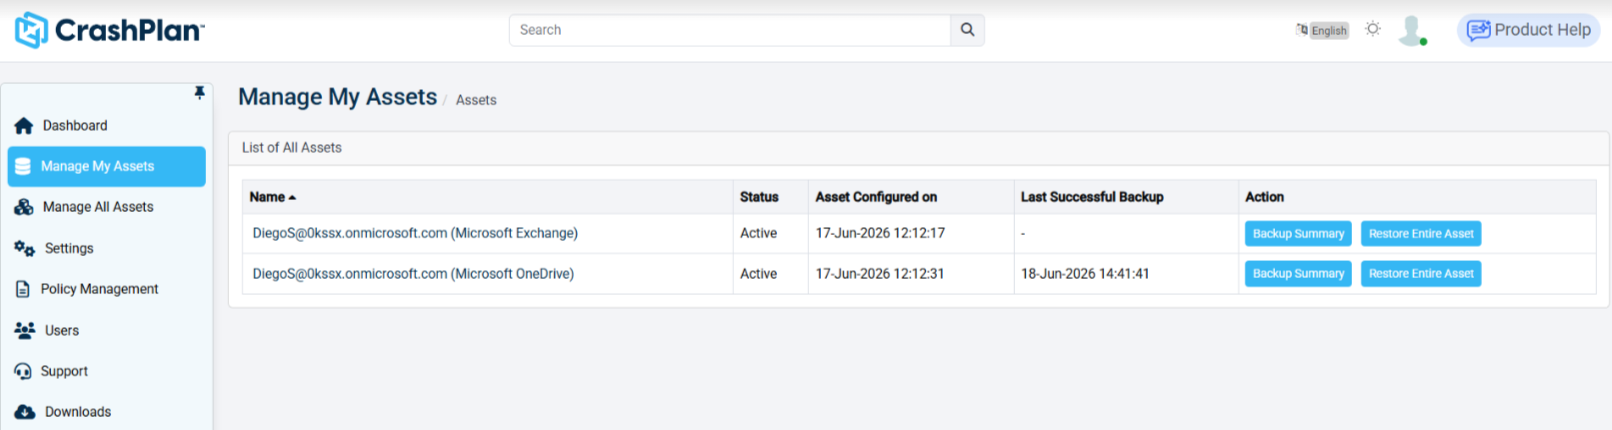
Review the asset list to identify the server or workload you want to manage.
Verify the Status of the asset to ensure it is Active and properly protected.
Check the Asset Configured On field to confirm when the backup configuration was applied.
Review the Last Successful Backup field to validate that the most recent backup completed successfully.
Click Backup Summary for the selected asset to view detailed backup information, including backup history, status, and data size.
If recovery is required, click Restore Entire Asset to initiate a full restore of the selected asset.
Monitor the backup and restore status regularly to ensure continuous data protection and operational readiness.
Asset Table Fields
Field | Description |
|---|---|
Name | Displays the name of the protected asset or workload. |
Status | Shows the current operational state of the asset (for example, Active). |
Asset Configured on | Indicates the date and time when backup protection was configured. |
Last Successful Backup | Displays the timestamp of the most recent successful backup. |
Backup Summary | Opens detailed backup information for the selected asset. |
Restore Entire Asset | Initiates a complete restore operation for the selected asset. |
Ensure that the asset remains in an Active state and verify backup timestamps periodically to maintain data protection readiness.
Backup Activity Summary
From the Manage My Assets page, click Backup Summary for the required asset.
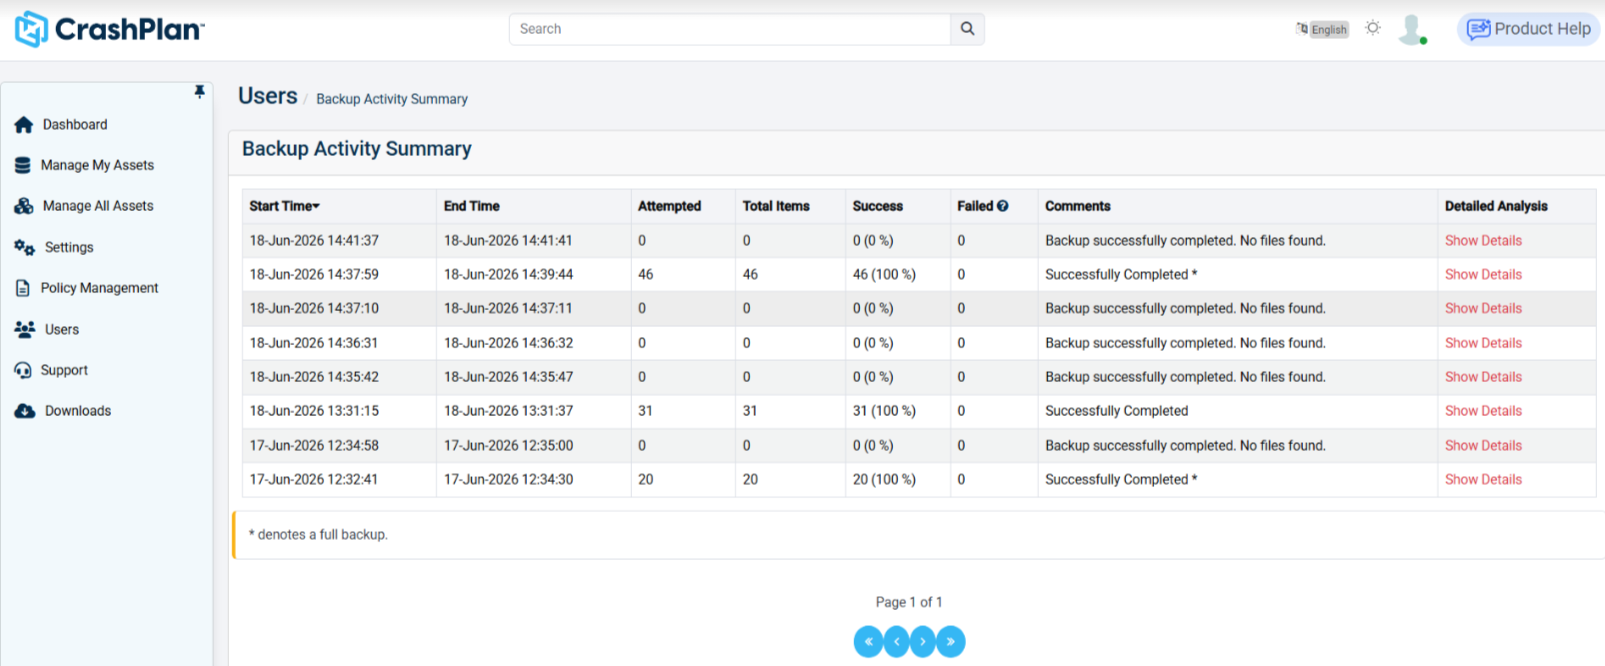
The Backup Activity Summary page opens, displaying the backup history for the selected asset.
Review the Start Time column to identify when each backup job began.
Check the End Time column to verify when the backup job completed.
Review the Attempted column to see the total number of items processed during the backup.
Check the Total Items column to confirm the total number of items identified for backup.
Verify the Success column to determine how many items were successfully backed up and the completion percentage.
Review the Failed column to identify any backup failures.
Check the Comments column for additional job status details, such as successful completion or if no files were found.
Click Show Details under the Detailed Analysis column to view deeper insights into the backup job, including item-level status and errors.
Use the pagination controls at the bottom to navigate through additional backup history records if multiple pages are available.
Regularly review this summary to monitor backup health, verify successful completion, and investigate any failures.
Restore an Asset
From the Manage My Assets page, click Restore Entire Asset for the asset you want to recover.
The Restore Settings window opens.
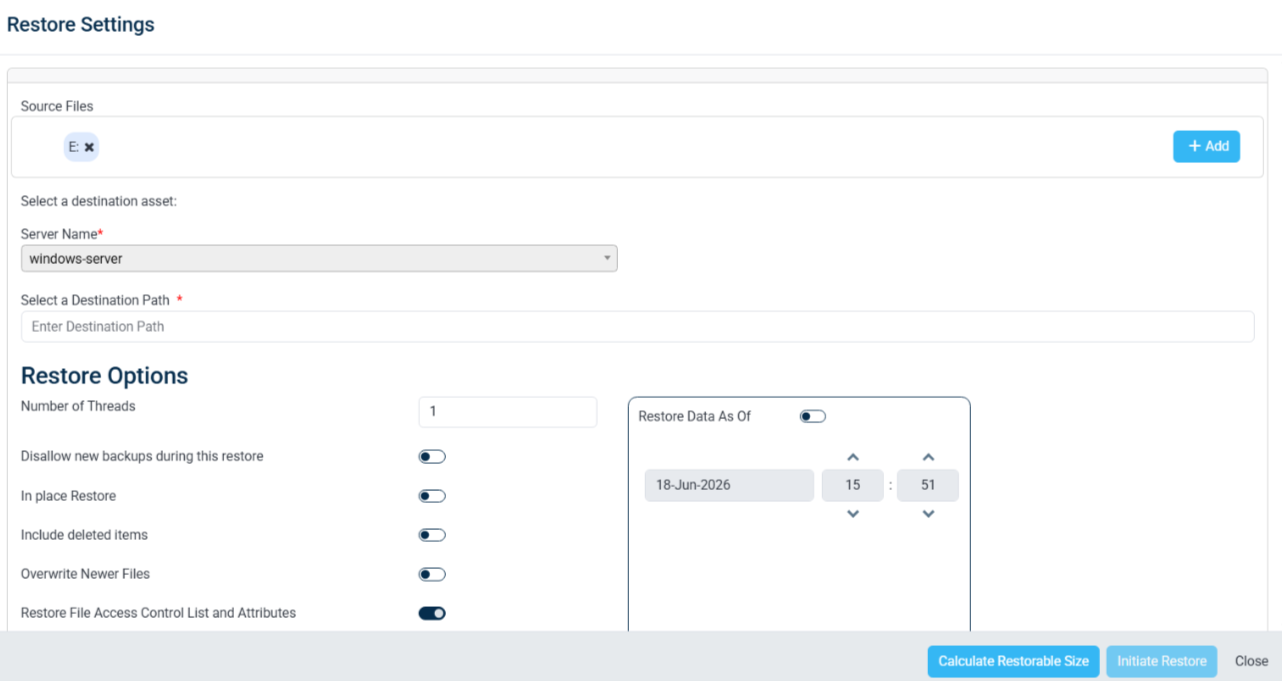
In the Source Files section, click + Add to select the files or folders you want to restore.
Under Select a destination asset, verify the User ID and choose the target Asset Name where the data will be restored.
In the Select a Destination Path field, enter the destination location manually or click Browse to choose the restore path.
Configure the required Restore Options:
Disallow new backups during this restore – Prevents backup jobs from running while the restore is in progress.
In Place Restore – Restores the data to its original location.
Include deleted items – Includes deleted files in the restore operation if available.
Enable Restore Data As Of if you want to restore data from a specific date and time, then select the required restore point.
Click Calculate Restorable Size to estimate the size of the data selected for restoration.
Review all selected settings and confirm the destination path.
Click Initiate Restore to start the restore process.
Monitor the restore progress and verify completion from the restore activity logs or status page.
Select a file or document and right-click OR click on the icon to perform the following actions:
Delete the file/folder
View the file
Check Versions of the file
Download the file
Restore the file
Share the file
Delete
Click the Delete icon to delete the file.
The Administrative Delete option is designed for enterprises to be regulatory compliant. This feature is helpful when enterprises have to delete specific backed-up files or folders. This option should not be used to delete a large amount of data. All data deletions using this feature are audit-logged.
Versions
Click the Version icon or launch the File Versions List page.
Select the required version and click the Download icon to download the file.
Click the Close button to close the window.
Downloads
Click the Download icon to download the file.
View
Click the View icon to view the contents of the file.