
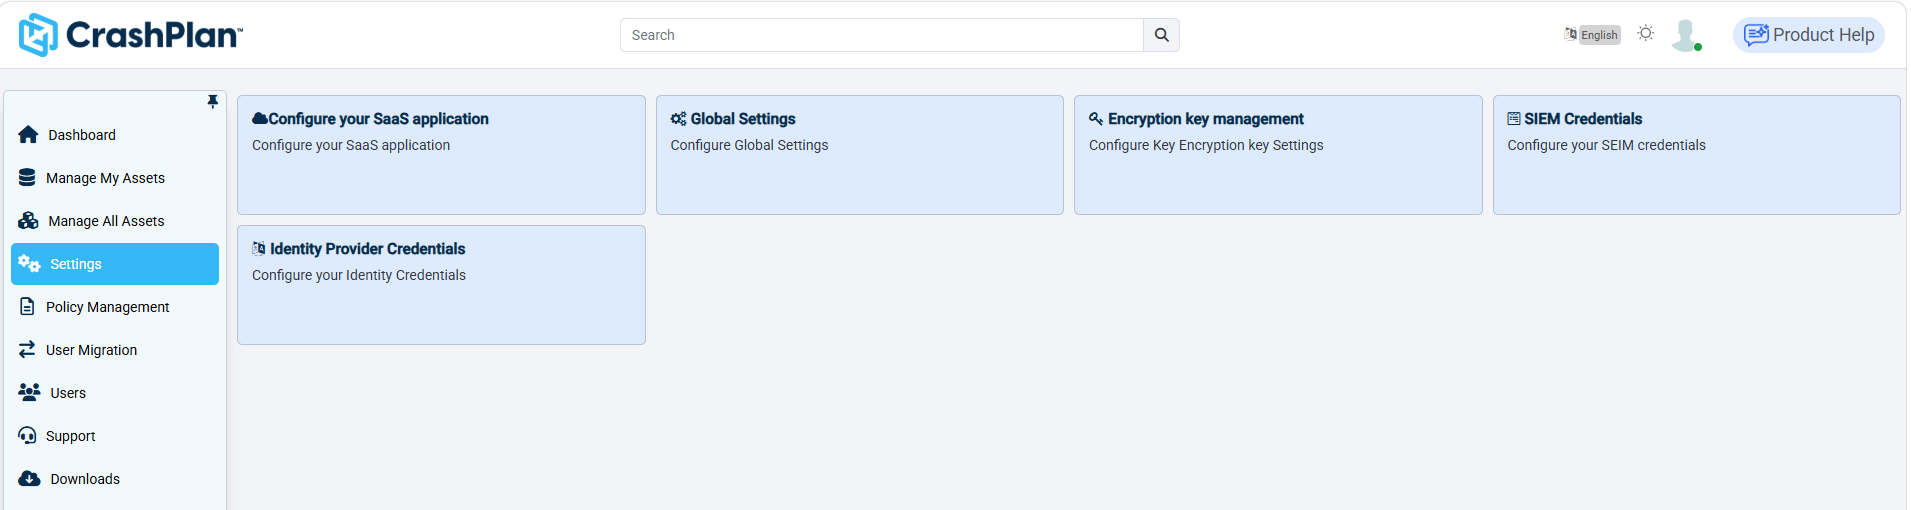
The Settings page provides centralized configuration options for managing the CrashPlan environment. From this page, administrators can configure SaaS applications, manage backup agent settings, define global system settings, and configure integrations such as Cloud-to-Cloud, Identity Providers, SIEM platforms, and encryption key management. These settings help ensure secure, consistent, and efficient operation of the backup environment.
Setting | Description |
|---|---|
Configure your SaaS application | Configure and manage supported SaaS applications for backup and protection. |
Cloud2Cloud Credentials | Configure the credentials required to connect and authenticate Cloud-to-Cloud backup services. |
Backup Agent Package Management | Configure backup agent package settings, including installation packages and agent-related configurations. |
Global Settings | Configure organization-wide settings that apply across the CrashPlan environment. |
Encryption Key Management | Manage encryption keys used to secure backup data and configure key management settings. |
SIEM Credentials | Configure credentials for integrating CrashPlan with a Security Information and Event Management (SIEM) platform. |
Identity Provider Credentials | Configure identity provider (IdP) credentials to enable user authentication and single sign-on (SSO) integration. |
Configure your SaaS Application
Log in to the CrashPlan Admin Console.
From the left navigation pane, click Settings.
Select Configure your SaaS application.
Choose the SaaS application you want to configure.
Enter the required application credentials and permissions.
Validate the connection.
Click Save.
The SaaS application is successfully configured and ready for backup operations.
To grant the required administrator consent for any workloads so that CrashPlan Platform can access and protect tenant data.
Log in to the CrashPlan Admin Console.
From the left navigation pane, click Settings.
Select Configure your SaaS application.
Review the note displayed on the page (For example: Microsoft 365 workloads).
Ensure you have Global Administrator privileges for the Microsoft 365 tenant before proceeding.
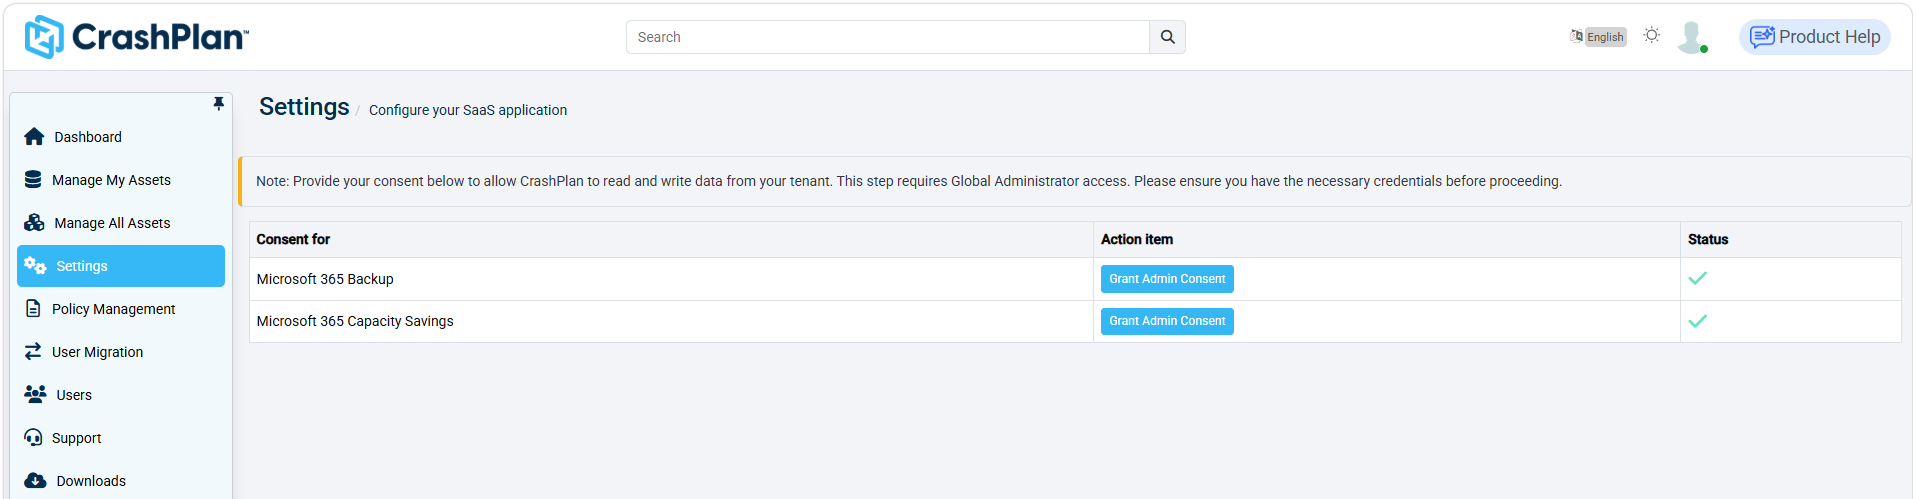
Under the Consent for section, identify the required workloads:
Microsoft 365 Backup
Microsoft 365 Capacity Savings
Click Grant Admin Consent for the required workload.
You will be redirected to the Microsoft authentication page.
Sign in using your Microsoft 365 Global Administrator account.
Review the requested permissions and click Accept to authorize CrashPlan access.
After successful authorization, return to the CrashPlan console.
Verify the Status column shows a checkmark, confirming that consent has been granted successfully.
CrashPlan is authorized to access the selected Microsoft 365 workloads and can perform backup and capacity savings operations for your tenant.
Configure Cloud2Cloud Credentials
The Cloud2Cloud Settings page allows administrators to configure the Microsoft 365 application credentials required for Cloud-to-Cloud backup. These settings establish a secure connection between CrashPlan and the Microsoft Entra ID (Azure AD) application, enabling authentication and access to Microsoft 365 resources. After configuring the required details, administrators can grant tenant-wide admin consent to authorize the application.
Setting | Description |
|---|---|
Client ID | Specifies the Application (Client) ID of the Microsoft Entra ID application used for authentication. |
Client Secret | Specifies the client secret generated for the Microsoft Entra ID application. |
App Name | Specifies the name of the registered Microsoft Entra ID application. |
Tenant ID | Specifies the Microsoft Entra ID tenant identifier associated with the organization. |
Client OneDrive for Business URL | Specifies the OneDrive for Business or SharePoint resource URL used by the Cloud-to-Cloud backup application. |
Client Token URL | Specifies the OAuth token endpoint used to obtain authentication tokens from Microsoft Entra ID. |
Save | Saves the configured Cloud2Cloud settings. |
Cancel | Discards any unsaved changes. |
Grant Admin Consent | Grants tenant-wide administrator consent for the configured Microsoft Entra ID application to access the required Microsoft 365 resources. |
All required fields must be configured with valid Microsoft Entra ID application details before administrator consent can be granted successfully.
Configure Backup Agent Package Management
The Backup Agent Package Management page allows administrators to configure and manage backup agent installation packages for endpoint and server devices. You can control whether users are allowed to download the agent, enable automatic agent updates, view the current agent version, and specify how new agent packages are distributed by providing a package URL or uploading an installation package.
The Endpoints tab is used to manage agent packages for desktop operating systems such as Windows, macOS, and Linux.
Setting | Description |
|---|---|
Endpoints | Configure backup agent packages for endpoint devices. |
Windows | Manage the Windows endpoint agent package. |
Mac | Manage the macOS endpoint agent package. |
Linux | Manage the Linux endpoint agent package. |
Allow Agent Download | Allows users to download the backup agent from the portal. |
Auto Update Agent | Enables automatic updates of the installed backup agent when a newer version is available. |
Current Version | Displays the version of the currently configured backup agent package. |
Package URL | Specifies the URL from which the agent installation package can be downloaded. |
Select File | Uploads a backup agent installation package directly to the server instead of providing a package URL. |
Choose File | Opens a file browser to select the installation package to upload. |
Save | Saves the backup agent package configuration. |
Configure General Global Settings
To define and manage platform-wide operational settings, password rules, restore permissions, email alerts, and miscellaneous preferences, follow the steps below:
Log in to the CrashPlan Admin Console.
From the left navigation pane, click Settings.
Select Global Settings.
Under the General tab, configure the following sections:
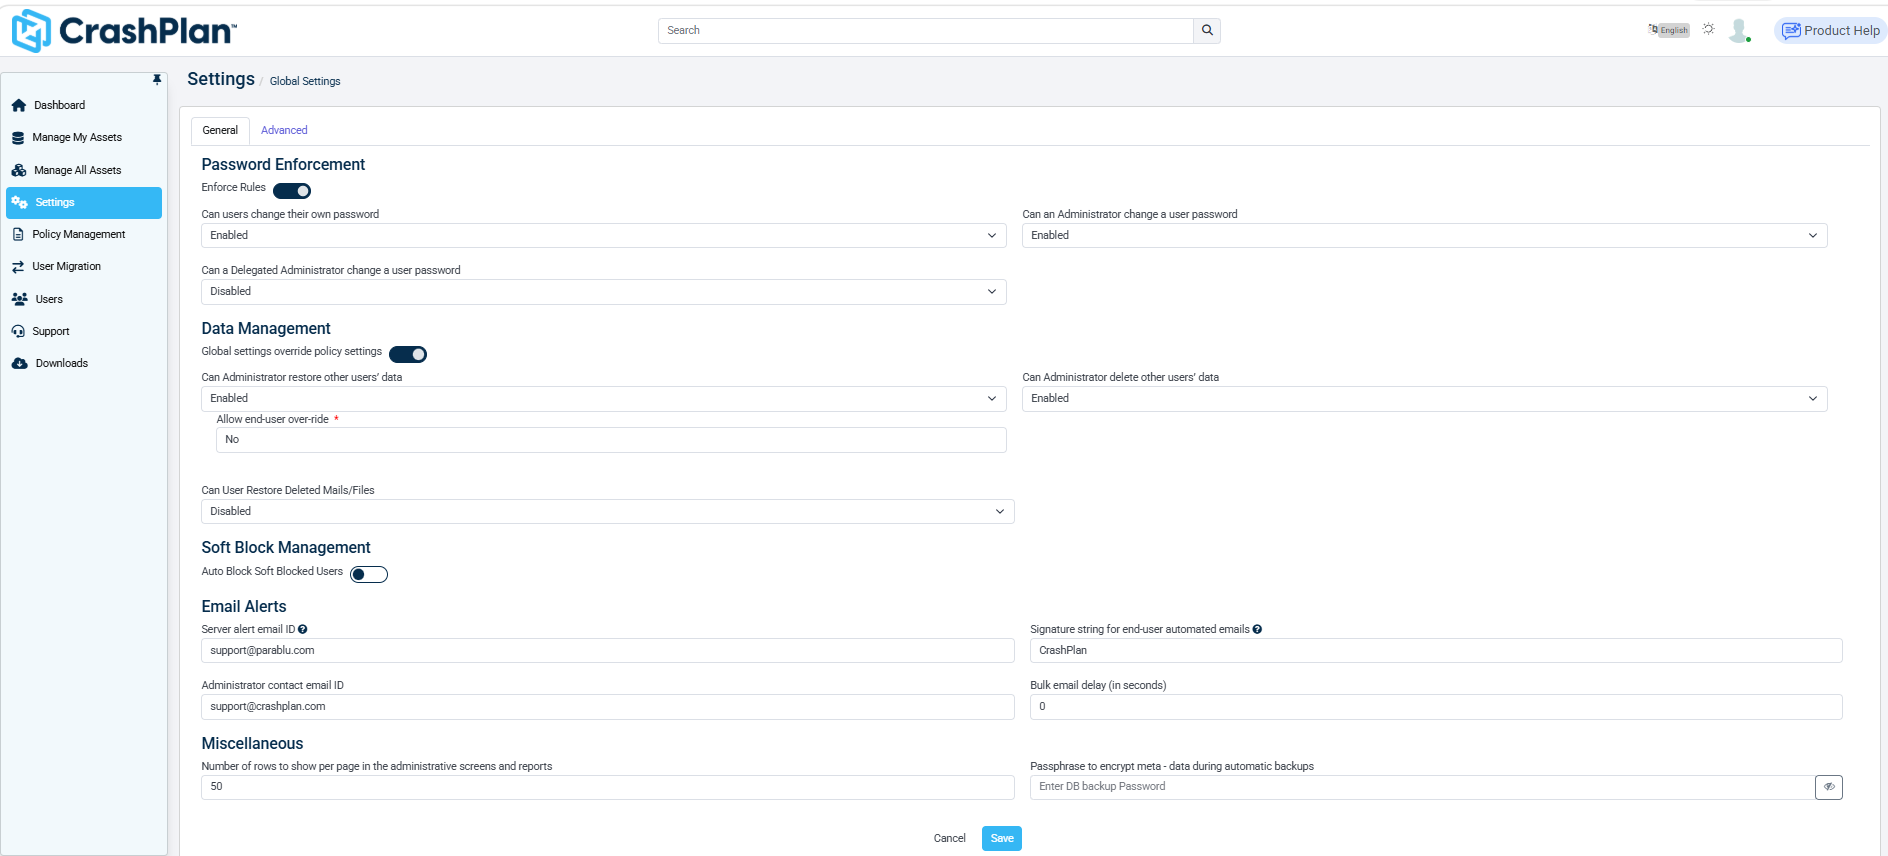
Password Enforcement
Use this section to control password-related permissions.
Enable or disable Enforce Rules.
Define whether users can change their own password.
Define whether an administrator can change a user password.
Define whether a delegated administrator can change a user password.
Data Management
Use this section to control restore and deletion permissions.
Enable or disable Global settings override policy settings.
Configure whether an administrator can restore other users’ data.
Configure whether an administrator can delete other users’ data.
Set Allow end-user override as required.
Define whether users can restore deleted mails/files.
Soft Block Management
Use this section to automatically handle soft-blocked users.
Enable or disable Auto Block Soft Blocked Users.
Email Alerts
Use this section to configure notification and communication settings.
Enter the Server alert email ID.
Enter the Administrator contact email ID.
Define the Signature string for end-user automated emails.
Set the Bulk email delay (in seconds).
Miscellaneous
Use this section to configure additional platform settings.
Define the number of rows to display per page in administrative screens and reports.
Set the passphrase to encrypt metadata during automatic backups.
Review all configured settings.
Click Save to apply the changes.
Click Cancel if you want to discard the changes.
Global platform General settings are updated successfully and applied across the environment.
Configure Advanced Global Settings
Use this procedure to configure advanced authentication settings, dashboard tile preferences, branding, and offline folder management.
Log in to the CrashPlan Admin Console.
From the left navigation pane, click Settings.
Select Global Settings.
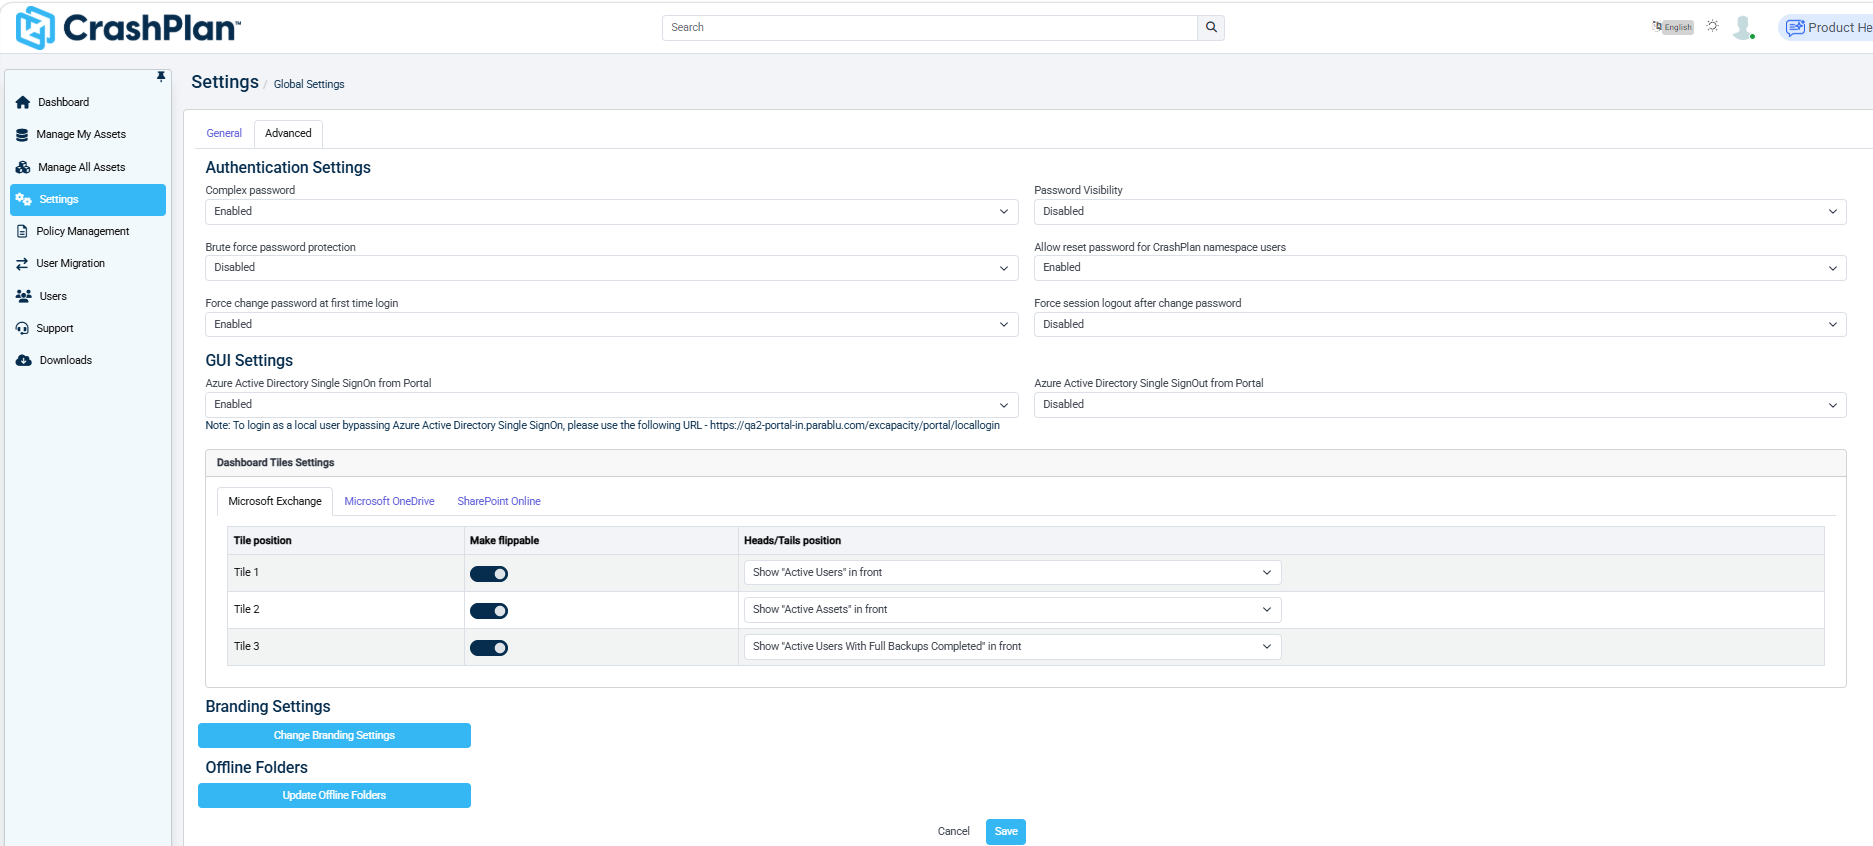
Click the Advanced tab.
Authentication Settings
Use this section to configure advanced user authentication controls.
Set Complex password to enable or disable password complexity rules.
Configure Password Visibility settings.
Enable or disable Brute force password protection.
Configure whether users can reset passwords for CrashPlan namespace users.
Enable or disable Force change password at first time login.
Configure whether to force session logout after password change.
GUI Settings
Use this section to configure Single Sign-On behavior.
Enable or disable Azure Active Directory Single SignOn from Portal.
Enable or disable Azure Active Directory Single SignOut from Portal.
Review the local login URL for bypass access when SSO is enabled.
Dashboard Tiles Settings
Use this section to customize dashboard tile behavior for workloads.
Select the Endpoints tab.
Configure tile settings:
Set the Tile position.
Enable or disable Make flippable.
Define the Heads/Tails position display.
Branding Settings
Use this section to customize platform branding.
Click Change Branding Settings.
Update branding elements such as logos or display preferences.
Save the changes.
Offline Folders
Use this section to manage offline folders.
Click Update Offline Folders.
Select or update the folders to be treated as offline.
Save the changes.
The Advanced global settings are updated successfully, including authentication policies, dashboard customization, branding, and offline folder configuration.
Manage Encryption Key Settings
Use this option to configure and manage encryption keys for securing backup data.
Navigate to Settings > Encryption key management.
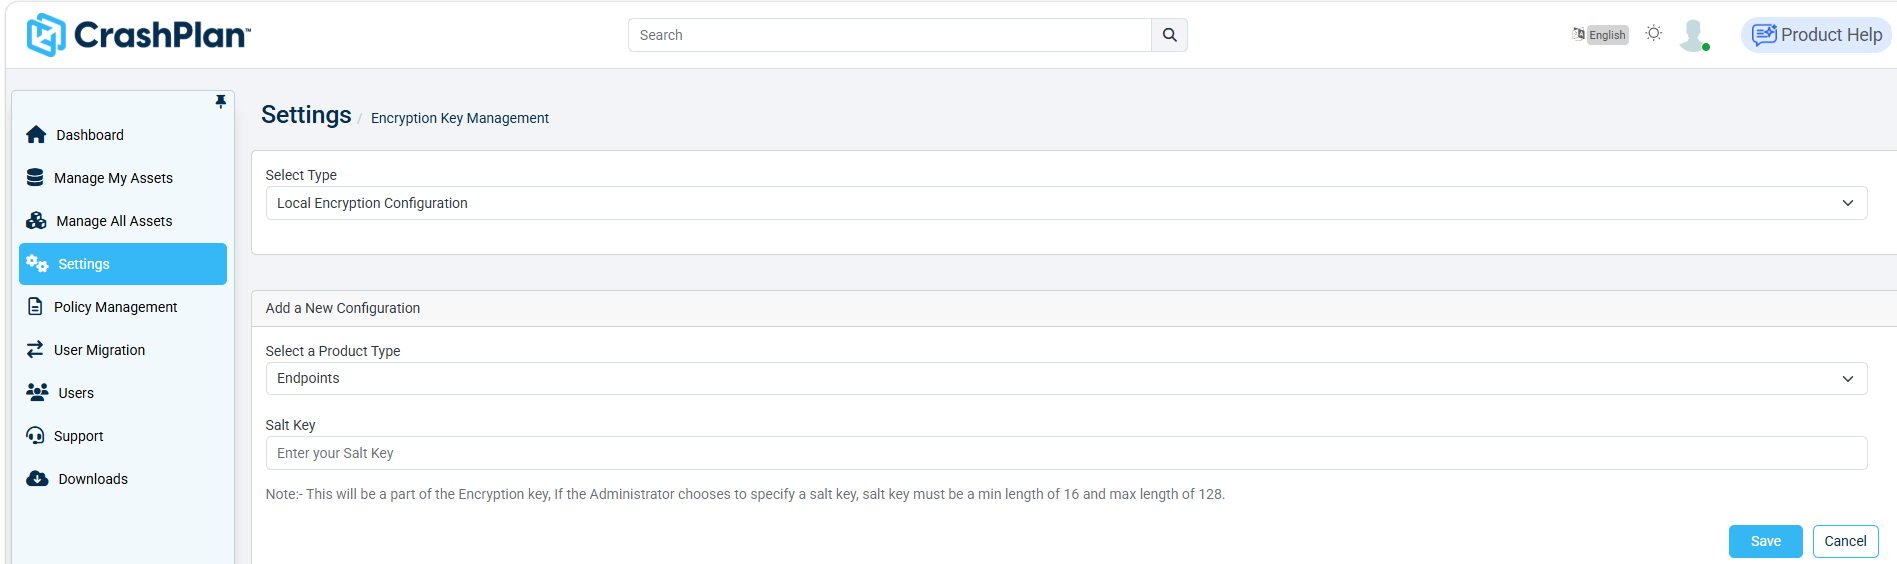
Review the current encryption key configuration.
Under Select Type, choose the encryption configuration type.
Example: Local Encryption Configuration
In the Add a New Configuration section, select the required Product Type (Example: Endpoints).
In the Salt Key field, enter the encryption salt key. The salt key must be between 16 and 128 characters.
Review the note displayed below the field to ensure the key meets the required criteria.
Click Save to create and apply the encryption configuration.
Click Cancel if you want to discard the changes.
The encryption key configuration is successfully created and applied, ensuring backup metadata and data are secured using the defined encryption settings.
Configure SIEM Credentials
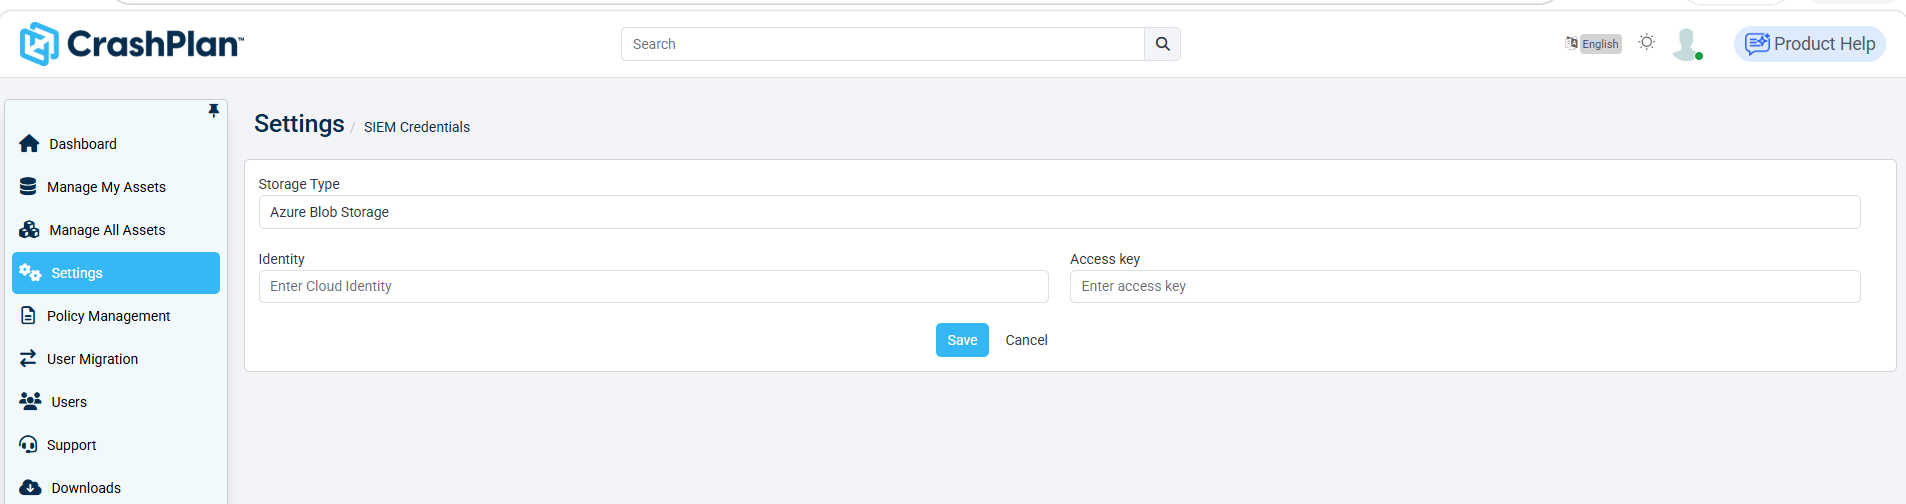
To configure storage credentials for Security Information and Event Management (SIEM) integration and enable secure log storage and forwarding, follow the steps below:
Log in to the CrashPlan Admin Console.
From the left navigation pane, click Settings.
Select SIEM Credentials.
Under Storage Type, select the required storage provider.
Example: Azure Blob Storage
In the Identity field, enter the cloud storage identity or account name.
In the Access Key field, enter the corresponding storage access key.
Review the entered credentials to ensure they are accurate.
Click Save to apply and store the SIEM credentials.
Click Cancel if you want to discard the changes.
The SIEM storage credentials are successfully configured, enabling CrashPlan to store and integrate logs with the configured storage backend.
Configure Identity Provider Credentials
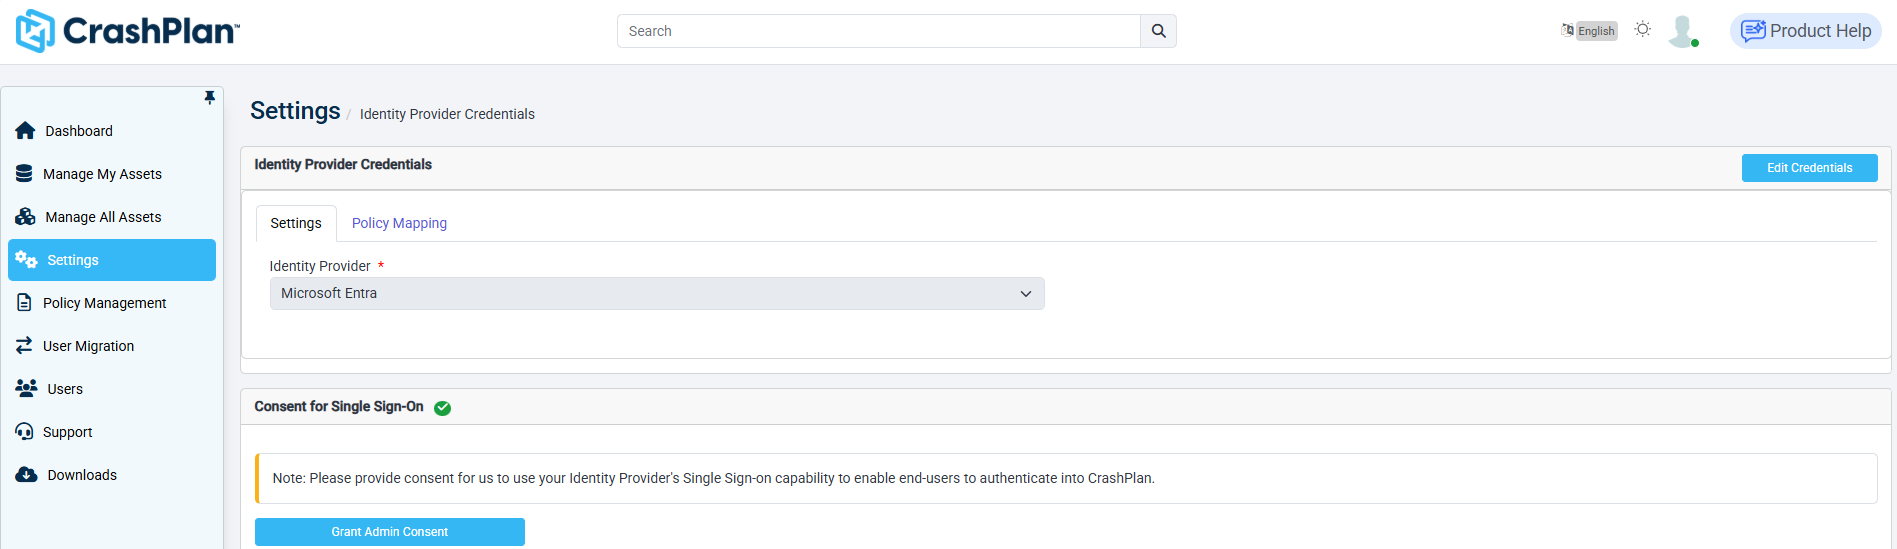
To configure identity provider settings and enable Single Sign-On (SSO) for user authentication in CrashPlan.
Log in to the CrashPlan Admin Console.
From the left navigation pane, click Settings.
Select Identity Provider Credentials.
Under the Settings tab, select the required Identity Provider from the dropdown.
Example: Microsoft Entra, Okta, OneLogin, or Google Identity
If existing credentials need modification, click Edit Credentials.
Enter or update the required identity provider configuration details.
Navigate to the Consent for Single Sign-On section.
Review the note displayed regarding consent requirements for enabling SSO.
Click Grant Admin Consent.
You will be redirected to the identity provider authentication page.
Sign in using an administrator account with the required privileges.
Review the requested permissions and click Accept to authorize SSO integration.
Verify the consent status is marked as successful (green check).
(Optional) Switch to the Policy Mapping tab to configure user-to-policy mapping based on identity provider attributes.
The identity provider credentials are successfully configured, and Single Sign-On is enabled for CrashPlan user authentication.