
In the left navigation pane, go to Policy Management.
Select Microsoft Exchange Policies or OneDrive for Business, then click Create Policy.
In the Policy Name field, enter a unique name for the policy.
(Optional) In the Description field, add a description to identify the policy purpose.
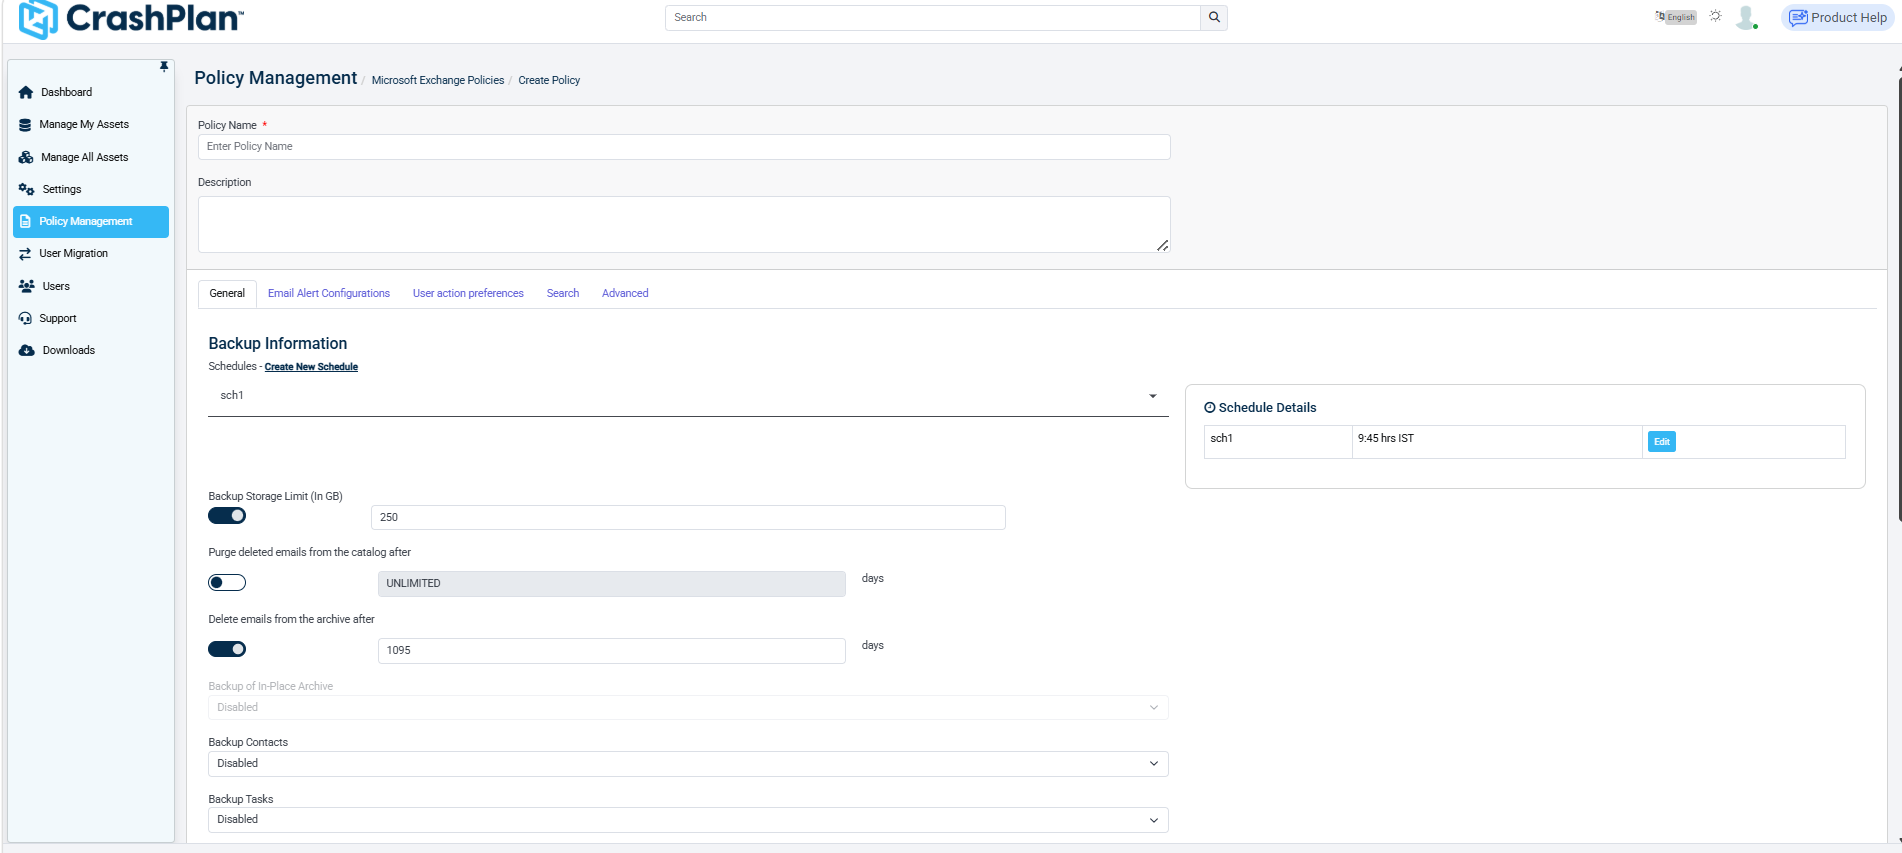
Under the General tab, configure the backup settings:
Schedules – Select an existing backup schedule or click Create New Schedule to create one.
Backup Storage Limit (in GB) – Enable and define the maximum storage allocation for the policy.
Purge deleted emails from the catalog after – Specify how long deleted emails remain in the catalog before being purged.
Delete emails from the archive after – Define the retention period for archived emails.
Backup of In-Place Archive – Enable or disable backup of in-place archive mailboxes.
Backup Contacts – Enable or disable contact backups.
Backup Tasks – Enable or disable task backups.
Turn on attachment archiving - Toggle this parameter on or off.
OFF - Attachments will not be archived.
ON - Specify how many days old an attachment should be before it's archived.
Review the Asset information section.
Default Folders to Backup - If desired, add default folders to be included in the backup. A Default Folders summary appears on the right, along with an X button to quickly remove folders.
For multi-tenancy policies, if you add a default path after the initial backup, the system backs up the newly added path during the next full backup only. It does not include the path in subsequent incremental backups.
Exclusion Folder Name - If desired, add default folders to be excluded from the backup. A Default Folders summary appears on the right, along with an Xbutton to quickly remove folders.
Review the Schedule Details section on the right to verify the selected schedule and backup timing.
Configure additional options in the remaining tabs as required:
Email Alert Configurations – Set notification preferences for backup events.
User action preferences – Define user-level permissions and actions.
Search – Configure search-related policy behavior.
Advanced – Configure advanced backup and retention options.
Click Save to create the policy.
Once created, the policy can be assigned to users or assets for automated Microsoft Exchange backup protection.
Configuring Email Alert Notifications
Use the Email Alert Configurations tab to define notification settings for important user, asset, backup, and restore events.
While creating or editing a Microsoft Exchange Policy, select the Email Alert Configurations tab.
Configure email notification preferences for the following events:
User Created – Enable notifications when a new user is added.
User Deleted – Enable notifications when a user is removed.
User Blocked – Enable notifications when a user account is blocked.
Asset Deleted – Enable notifications when an asset is removed.
Asset Blocked – Enable notifications when an asset is blocked.
Weekly Backup Report – Enable to receive weekly backup activity summaries.
First Backup Completed – Enable notifications when a user’s first backup finishes successfully.
Restore Initiated – Enable notifications when a restore operation begins.
Storage Limit Reached – Enable notifications when the configured backup storage threshold is reached.
For each event, select the required notification state from the drop-down menu.
Review the configured alert settings to ensure they align with your administrative and compliance requirements.
Click Save to apply the alert configuration settings.
These alerts help administrators monitor backup activity, user lifecycle events, and storage usage proactively.
Configuring Search Settings
Use the Search tab to enable or disable content indexing for Microsoft Exchange backups.
While creating or editing a Microsoft Exchange Policy, select the Search tab.
In the Content Index field, choose one of the following options:
Enabled – Allows indexing of backup content for faster and more granular search operations.
Disabled – Disables content indexing, which may reduce storage and processing overhead.
Select the option based on your search and compliance requirements.
Click Save to apply the configuration.
Enabling content indexing improves searchability of backed-up Exchange data and supports faster recovery workflows.
Configuring User Action Preferences
Use the User action preferences tab to control what actions end users can perform within the CrashPlan Platform portal.
While creating or editing a Microsoft Exchange Policy, select the User action preferences tab.
Under the Portal section, configure the following options:
Open – Enable or disable user access to open and browse backup content.
Mail Preview – Enable or disable the ability to preview email content before restoring or downloading.
Download – Enable or disable the ability for users to download backed-up emails or related content.
Restore – Enable or disable user-initiated restore actions.
For each setting, choose the required option from the drop-down menu.
Review the permissions to ensure they align with your organization’s security and operational requirements.
Click Save to apply the changes.
These settings allow administrators to control end-user access and actions, helping balance flexibility with data security.
Configuring Advanced Settings
Use the Advanced tab to configure additional policy controls related to legal retention, user access, and inactive asset management.
While creating or editing a Microsoft Exchange Policy, select the Advanced tab.
Configure the following options under Options:
Legal Hold
Enable this option to preserve backup data for compliance or legal investigation purposes, preventing deletion based on retention policies.
- Web Based Login
Enable or disable web-based user authentication for portal access.
- Delete assets which have not been active for
Configure the inactivity threshold (in days) after which inactive assets are automatically deleted.
- If disabled, assets remain indefinitely (Unlimited).
Review the administrative controls displayed:
Can Administrator Restore User Data
Can Administrator Delete User Data
These options may appear grayed out if they are controlled by Cloud Properties. Update them from the Cloud Properties page if changes are required.
Verify the settings based on your organization’s retention, compliance, and access requirements.
Click Save to apply the advanced policy settings.
These advanced controls help enforce governance policies, manage inactive assets, and support legal compliance requirements.