
Use the Manage My Assets page to browse Microsoft Entra objects protected by CrashPlan. You can view the current state of the tenant, view objects from a specific point in time, include deleted objects, calculate the number of protected objects, and compare tenant states.
View Microsoft Entra objects
Sign in to the CrashPlan Portal.
From the left navigation menu, select Manage My Assets.
Select the Microsoft Entra asset you want to view.
The MSFT (Microsoft Entra) page displays the protected Entra object categories.
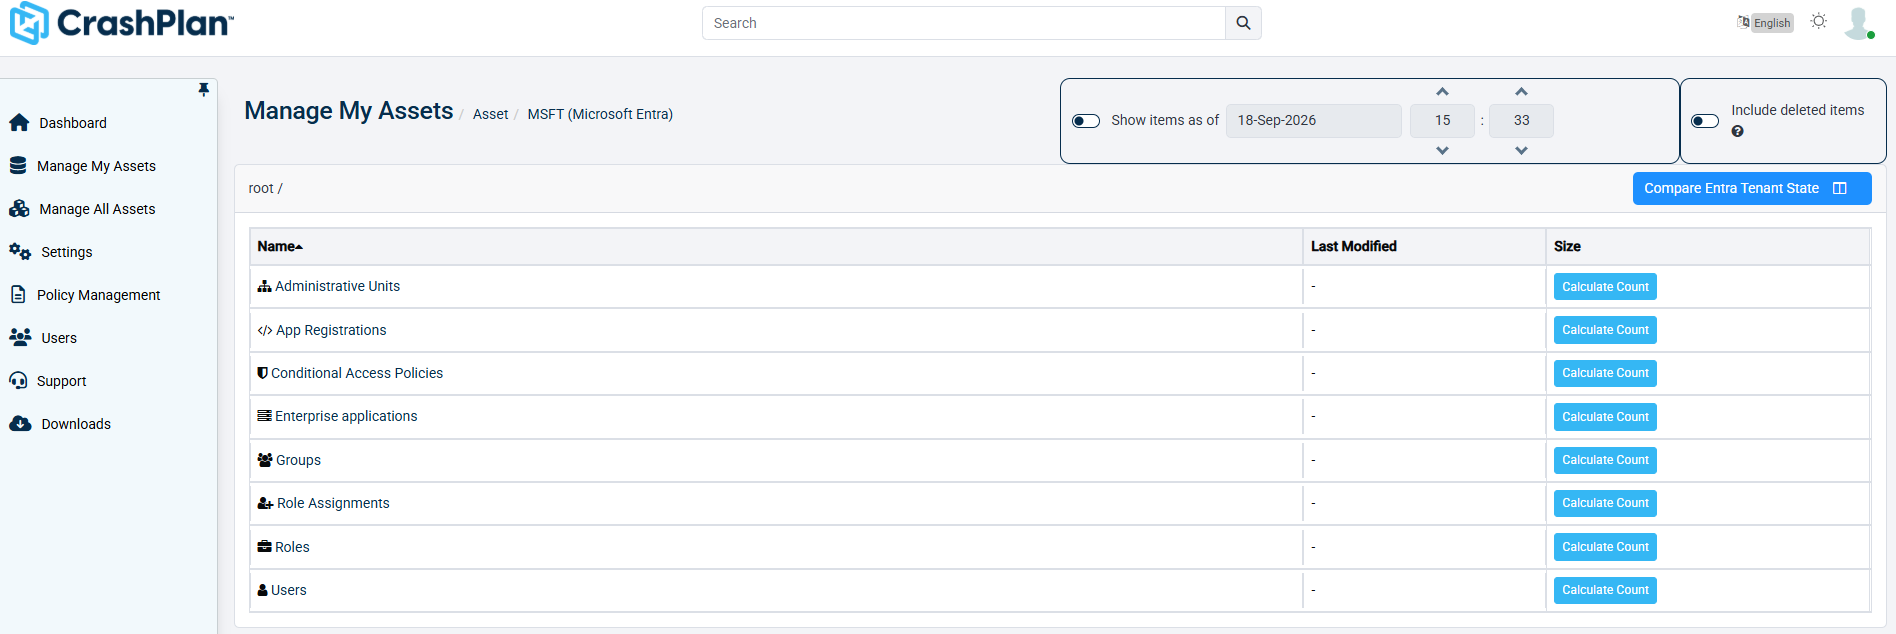
Select an object category to browse its protected objects. Available categories include:
Administrative Units
App Registrations
Conditional Access Policies
Enterprise applications
Groups
Role Assignments
Roles
Users
When a deleted Conditional Access Policy is restored, the system creates a new policy instead of moving the deleted policy back to active.
Use the Name, Last Modified, and Size columns to review information about the available objects.
Open the User object to drill down one level deeper and review the details of an individual user.
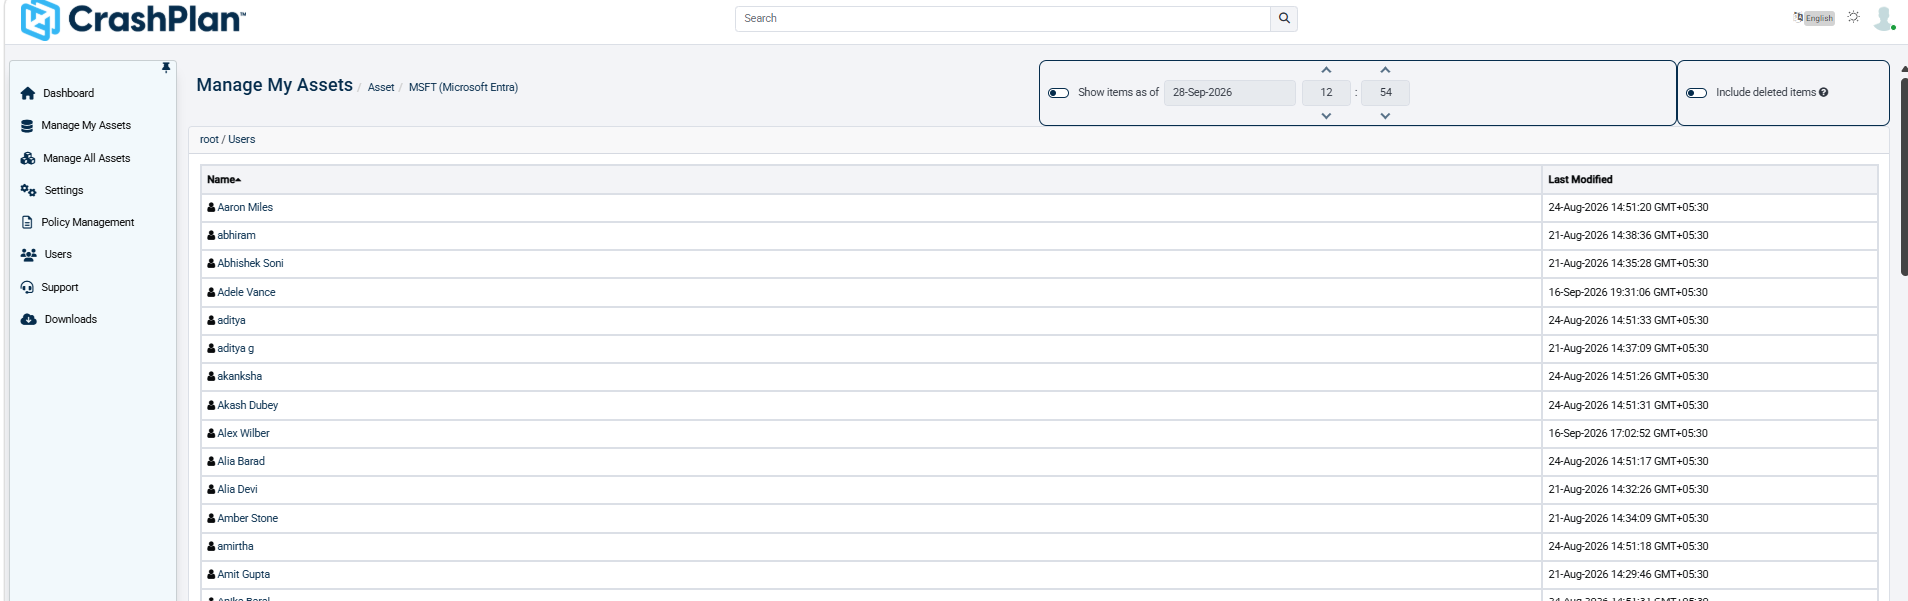
Select the desired user and click Download to export the protected object information. The exported protected object information will be downloaded in JSON format for easy review and processing.
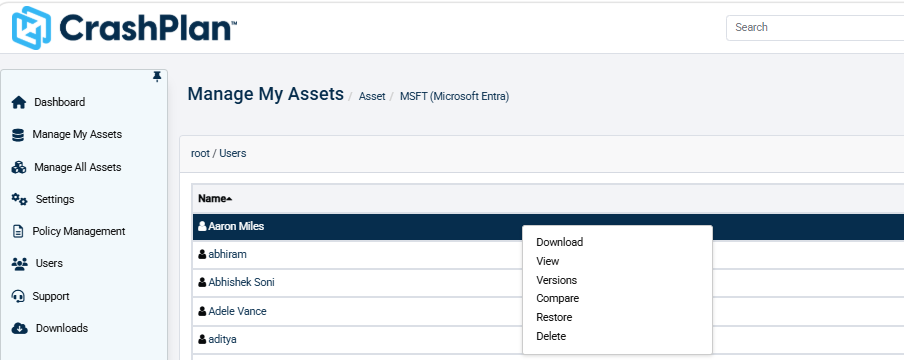
Click View for the user object to inspect the attributes captured by CrashPlan. The user attribute's view provides more than confirmation that the user existed, it lets you review the protected values associated with that user at that specific point in time.
Click Download in the View modal to export the user’s protected Entra attributes. The information will be downloaded in JSON format for easy review and processing.
Click Versions to view the multiple backup versions retained by CrashPlan. Users can review the backup timestamp for each retained version and access options to Download, View attributes, or Restore the selected version.

The selected version can be restored at different levels based on the recovery requirement:

Object Only can restore the complete object, including its relationships and all the attributes.
Relationships Only can restore only the relationships associated with the object.
Properties Only can restore only all/selected protected attributes of the object.
When restoring Object Only, users can choose to preserve the object’s relationships or turn it off.
In Microsoft Entra, for the same user, update the latest Job Title, Company Name, and Department properties under Job Information.
View objects from a specific point in time
Use Show items as of when you want to view the Microsoft Entra tenant as it existed at an earlier date and time.
Enable Show items as of.
Select the required date.
Specify the hour and minute using the controls provided.
CrashPlan displays the objects available in the backup for the selected point in time.
Browse the required Entra category to locate the object you want to review or restore.
Note: The objects displayed depend on the backup data available for the selected date and time.
Include deleted items
By default, deleted objects may be excluded from the displayed results.
Enable Include deleted items to include deleted Microsoft Entra objects in the browsing results.
Browse the required object category.
Disable the option when you want to return to a view that excludes deleted objects.
This option is useful when locating an Entra object that has been deleted from the source tenant but remains available in CrashPlan backup data.
Calculate the object count
The Size column provides a Calculate Count option for each Microsoft Entra object category.
Locate the category for which you want to determine the number of objects.
In the Size column, select Calculate Count.
CrashPlan calculates the number of objects available for that category.
Repeat the process for other categories as required.
For example, you can calculate the number of protected Users, Groups, Roles, or Enterprise applications without opening each category.
Compare Entra tenant states
Use Compare Entra Tenant State to compare Microsoft Entra tenant information across available backup states.
From Manage My Assets > MSFT (Microsoft Entra), select Compare Entra Tenant State.
Configure the comparison using the options presented on the comparison page.
Select Source Backup to choose the backup snapshot you want to use as the source for comparison.
Select the desired backup snapshot to use as the source for comparison. After the first full backup is completed, only one backup snapshot will be available for comparison.
Select Compare with to choose the target data set for comparison against the selected source backup snapshot.
Click Compare to compare the selected backup snapshot with the live data from the Microsoft Entra tenant.
Review the results to identify differences between the selected Microsoft Entra tenant states.
The Source and Compare With attributes can be reviewed side by side for an easy comparison of changes
No color - No change.
Green - Newly added attributes.
Red - Removed attributes.
Purple - Modified attributes.
Users can download either the Source backup or the Compare with data in JSON format for further review and analysis.
Export CSV provides flexible download options for comparison results. Users can export All attributes or Changed attributes only, with the Source and Compare With values presented side by side in CSV format for easy analysis.
When the Show Selected checkbox is unchecked, all attributes from the comparison results are displayed.
The Show Selected checkbox filters the comparison results to display only the selected attributes.
The Restore option in the Compare workflow allows users to restore data to the live Microsoft Entra environment from either the Source Backup or Compare With snapshot.
Users can select the desired source from which to restore.
When the comparison is performed against Live Data, restoration is available only from the Source Backup.
If no attributes are selected from the comparison results, the Restore option remains disabled and cannot be initiated.
Once the Restore From source is selected, review the Restore Settings to confirm the selected properties, target tenant, and backup options. You can also enable or disable backup during the restore and specify the Restore Data As Of point in time. After reviewing the settings, click Initiate Restore to start the restore process.
Once the Restore From source is selected, review the Restore Settings to confirm the selected properties, target tenant, and backup options. You can also enable or disable backup during the restore and specify the Restore Data As Of point in time. After reviewing the settings, click Initiate Restore to start the restore process.
The compare downloads the complete object from the selected backup version. Any attribute-level selections made during the comparison do not restrict or limit the download scope.
This can help identify changes to Entra objects between different points in time, such as additions, deletions, or configuration changes.